31 December 2012

focus: a word for 2013

Last year was the first year that I chose a ''word'' for the year. A word that described everything that I wanted the coming year to teach me....it was "self-sufficient". Maybe I cheated a little bit on the hyphen, but whatever. I'm not sure if I succeeded, but there were definitely days that pushed me into this and days that pushed me right back to where I started. I'm a very dependent person by nature, and I always have been....but I think what I realized was that sometimes its okay to need someone. On the other hand its good to have enough confidence in yourself to know that you can fill in the blank on your own. I wasn't very conscience of this as I was going through the year - honestly, I pretty much forgot that I chosen a word at all. This makes me think that maybe my word for this coming year should be ''intent'' - close, but not quite right. 

Focus.

This coming year I want to keep a steady focus.  I want to focus on my health, on my marriage, on my relationship with God. I want to focus on each day and not just "big picture'' things. I do want to live with intent, but I want it to be more than that. I want to do things because I chose to do them, not because they happened to me. I want to be proactive and not so reactive. This may sound silly to some of you, but for me its probably one of the hardest things for me to overcome.

I am pressing forward into 2013.... I have big plans and dreams and I'm feeling extremely optimistic.

30 December 2012

Handmade Christmas

 As promised here is a little peek at our hand made gifts from Christmas!!

If you didnt already know, Craig and I make each other 1 handmade gift each year. This year I made him a cribbage board and he made me a docking station! I was so impressed with how both of our gifts turned out....and I particularly like the plate and knobs that Craig took off an old radio to fix onto my docking station. Perfection!!

I'm a little sad that Christmas has already come and gone BUT we're having a New Year's Eve party at our house this year, complete with our own photobooth! I'm so excited....but I have soo much to do before tomorrow night! So with that I will leave you - I hope that you're all having the best weekend!


28 December 2012

Craig-isms: the perfect Christmas gift

You've all seen these Ryan Gosling funnies floating around Pinterest lately, right? Well I think they're positively hilarious. I can't help myself but to really laugh-out-loud when I read them.

Well, Craig surprised me with his own versions that he likes to call "Craig-isms" - probably the best Christmas present ever..? I think so. He gave them to me as a early present on Christmas Eve. I was laughing so hard that night...here's a little peek.
 
^ this one is a bit facetious, he hates when I do that, haha

We had a really great time at Christmas! My parents came into town and we made cookies, wrapped presents, ate all of our favorite dinners, and watched silly Christmas movies in our PJs. It was really the best time. We were having such a great time that I totally forgot to take any pictures! oopsy.

Our handmade gifts both turned out so great - it is still my favorite part of Christmas. I'll be sure to show a few pictures tomorrow of those.

I hope you all had the very best time with your friends and family too! Next up: my favorite holiday, New Years!!

18 December 2012

Last Minute DIY Gifts

Is it really only ONE week until Christmas?! I don't know about you, but it has totally snuck up on me this year! There are still a few gifts that I need to put together for some friends and co-workers, and I always love making these myself. There's just some sort of satisfaction that comes from handmade gifts, no? 

Just like every year Craig and I give each other 3 store bought gifts and 1 hand made gift. It is such a treat to see what he came up with for me....and thinking of something for him (which can be hard!!) As I type this I can literally hear him sanding and hammering in the garage while he's working on my gift. The anticipation is killing me! :) 

Here are a few of my favorite gifts that I came across online, just in case you're in need of a quick gift....or if your Christmas budget ran out a few gifts ago - like mine ;)

1 / 2 / 3 / 4 / 5

17 December 2012

Music Monday: Christmas Edition

Prepare yourselves...this list is pure magic.  Every single one of my favorite Christmas songs all together. 

And so help me (fist shake) if anyone makes fun of my N*Sync, Hawaiian Christmas, or super annoying Rudolph song......it totally wont even matter. I'll go on loving it with every ounce of my eggnog-drinking, ugly-sweater-wearing, Christmas-loving being. You know you love it too ;)

13 December 2012

Real Life: iPhone


early morning spin class & homemade turkey noodle soup

trip to the zoo
finding a quick little resting spot
2 major DIY fails. It happens, friends.
blurry "after" pic outtakes - see the actual post here 
getting into the Christmas spirit
sneek peek into the spare bedroom & new purchases from Target

12 December 2012

10 December 2012

Music Monday: The Lennings

We've made it to another Monday. How was your weekend?? Mine involved lots of high cardio workouts and room organizing. Oh, and finally decorating our tree!

I am crazy sleepy today...I went to bed around 1:30 and woke up at 4:30 for spin - that's not a lot of sleep, folks. And I really don't do well with out my beauty sleep. ugh.

Because I don't drink caffeine I think I'm going to need some extra love and cuddles today - luckily its a grey and rainy day here in Atlanta and I have lots of tasks to keep me busy at work today. I'll be wrapped up in a blanket with my Kennedy Buttons before I know it...


I have probably played this song a hundred times since I heard it this week. It gives me all the warm and fuzzies. Just try not to be crazy happy while listening to it...cause you can't. Enjoy! xx

07 December 2012

Make This: Holiday Banner

This DIY is so much fun! If you've never used iron on transfers before you're going to love them! (but please don't make any cheesy t-shirts...unless they're for a really good cause like running a 10k for the homeless...okay?)

Supplies:
1. Fabric of Choice
2. Dowel Rod
3. Green Thread
4. Transfer Paper
Not Shown: Scissors, Iron, Sewing Machine, Twine

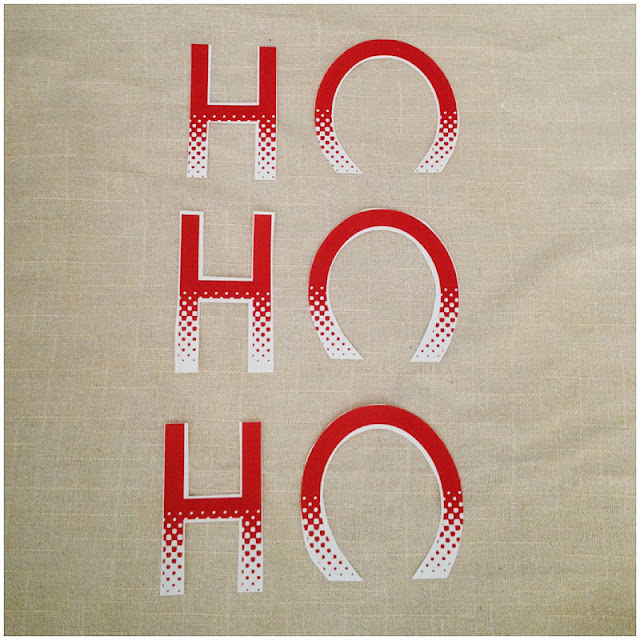
Step 1: The first thing that you're going to want to do is decide what you want to print onto your banner. I went with a simple HO HO HO and found a really cute font that made me think of snow. You can download it here for free! Make sure that you read the directions for the transfer paper so that you'll know which is the proper side of the paper to print onto. Mine had a purple line to help me decipher. I always print on a plain piece of paper first to check the size and color to make sure that I like it.  
Note: When printing onto iron-on paper your image must be backwards or it will print incorrectly. Now, I am fully aware that HO and OH are the same backwards and forwards but I always make a habit of doing it just as a reminder. 
Step 2: Cut out your letters. With this step you're going to want to get as close as you can to the letters to prevent it from looking too plastic-y. You'll see what I mean when you iron them on. 
Step 3: Lay out your letters to see how big to make the banner. Most of you would probably do this the other way around, but as I'm sure you've already noticed I'm really a go-with-the-flow kind of girl and decided to just wing it. Measure out the banner and be sure to leave about an extra inch up top to make a loop hole for the dowel. 
Step 4: Sew your edges. I chose green thread to stick with the holiday theme, but you could choose a color closer to the fabric of your banner if you would like to hide the seam. This is especially a good idea if you're not very experienced in sewing, if your thread is too bright you'll be able to see each and every mistake. I like the small pop of color! Don't forget the loop at the top of the banner for your dowel to fit into. I used a small dowel so it was very easy to leave a big enough gap for it to pass through.
Step 5: Lay your letters on the banner ink side down. Make sure that they are in the exact spot that you would like because once you start this step you cant go back to move them. Make sure that there is no water in your iron and place the banner onto a hard surface - not your ironing board. Iron each letter for about 90 seconds and wait for it to cool. Peek under one of the letters to make sure that it transfered and then you're free to lift! This is the fun part!

Step 6: Slide the dowel in and hang! I used some thick twine to keep it simple - and thats it!

06 December 2012

looky looky!


You guys! I got a new toy ;)  Sorry for the lack of a real post today, I've been too busy working and playing with this guy all day. I promise to have a fun Christmas DIY for you tomorrow!

05 December 2012

Before and After: Upholstered Chair

Before...
and After...
Lets be honest here, I can't lie to you guys.... this chair isnt completely finished. I still have to put the decorative tacks around the legs and add the dust collector to the bottom (you know that black fabric that is under the chair that will hide that awkward piece of pipeing hanging down). But I have so much going on that I'm not sure when I'll actually finish this. Honest moment...I don't always finish my projects 100%. Please tell me that I'm not alone in this....right?
I actually WILL finish these little details but my fabric for the dust collector is taking longer than expected to come in and I'm already 95% finished with another chair, which I'll show you all soon! 
What do you think? I saw a chair on Pinterest the other day that I wish I could have said was my ''inspiration'' piece, but no - haha! Even still, it's part of my spare room remodel and I really love how its neutral, but still has a fun pop of pink when you get up close. I promise that it will be 100% once I show off the rest of the room! No really, I pinky promise :)


04 December 2012

03 December 2012

Music Monday: Lykke Li

Happy Monday, friends!

I hope you all had a fantastic weekend! Mine went by too fast, but it was so lovely. Saturday I spent the day working on some new tutorials and making all of the pillows for my spare bedroom remodel - which I can't wait to show you! Sunday was the last day that Craig and I have off together before Christmas so we were able to go shopping and break out all of the holiday records. 

We stayed up super late last night talking about some big plans that are in the works and some very important (and fun!) decisions that we're making.  I can't wait for our next chapter - I'll be sure to share more details as the ball begins to roll. Nothing to report yet :)

And just in case you have a case of the "Mondays" heres a fun little tune to pick you up...


28 November 2012

Build This: Open Shelving

I have been dying to redo my kitchen, I mean with all of the Pinterest inspiration who wouldnt?! But we aren't planning on staying in our house for much longer so it isnt really practical for us to put the money into a complete overhaul. Craig and I tend to be the king and queen of compromise, so we were able to come up with a pretty simple and inexpensive alternative. We took out one of our cabinets and put up some inexpensive shelving to show off our pretty dishes and vintage canisters. Here's the step by step on what we did....
Step 1: Take Off Existing Cabinet
One of the major differences between me and Craig is that he is the kind of person who so politely takes the cabinet off the wall with out damaging it just in case the next home owner wants to put it back up; and I showed up in the kitchen with a hammer and protective eye wear ready to demo this sucker. No go. 
Step 2: Spackel
You will more than likely have holes in the wall that you'll need to patch up when you remove your current cabinet. We had many.  We used the fancy kind of spackel that starts out purple and turns white when you're ready to paint  - Speaking of painting...we had to paint the wall where the cabinet was. You may or may not need to do this depending on if you've painted your kitchen already. 
Step 3: Measure
Before you do anything else you'll need to measure out where your brackets are going to be, and make sure that they'll be level. Look at those mad leveling skills up there! Craigy let me do this part. 
Step 4: Paint Shelves
I, luckily, had extra paint from when we painted our cabinets before. I was thinking about staining these, but wanted the kitchen to be uniform so we painted.  
*Tip: If you go to Home Depot you can pick out your wood and they'll cut it to the exact measurements for free. Whoop! That saved us a lot of time. 
Step 5: Hang those suckers
I usually put more holes in the wall than necessary when I try to hang things, and since we worked so hard on our spackeling already Craig thought it was best to take on this part. Okay, lets be honest...this is really a Craig DIY, its cool. We decided to use 3 brackets instead of 2 for extra support, and I am really happy with how it turned out.Next: Decorate
I used pretty bowls, vintage canisters, and some of my favorite cook books. I planted herbs in the canitsters - I can't wait for them to start growing!
I am so happy with how my shelving turned out - It is exactly what I wanted.

27 November 2012

Stocking Stuffers

I'm not sure if you can believe it or not, but Christmas is exactly a month away...4 weeks! eek! I have about 90% of my shopping done, with just a few items left to pick up. I usually have a hard time thinking of gifts for all of my family, but this year it was actually pretty easy. If you have any 20-somethings on your list and aren't sure what to pick up (or if you're my husband and you're reading this-hint! hint!) here are some of my favorite picks for a small exchange or stocking...

1 here / 2 here & here / 3 here / 4 here/ 5 here, here & here

26 November 2012

Music Monday: Jack Penate

Oh, four day weekend. How I loved you. 

Is it just me or did Thanksgiving go by super fast?? And now we're in full-on Christmas mode! I've been seeing all of the instagrams of people going to pick out a Christmas tree. Well not at our house...I have a mister with the flu so it will just have to wait. Honestly I haven't even really started listening to Christmas music yet. lame. 

So now its back to work, upholstery projects, blogging, and not eating 10,817 calories a day. also lame. Mostly just the not eating all day long part, and the working part. Can't I just stay home and work on fun projects all day? Husband says no. 


So now I leave you with a song. I hope you all enjoyed your Thanksgiving holiday as much as I did. Fingers crossed that we can all get into the swing of things quickly! 

24 November 2012


We start out every year by thinking "this is going to be the best one yet!"

This one was not.

It's been really tough. Probably one of the toughest ones that we've had. We have dealt with our fair share of personal and health issues, losing friends and finding out which ones to let go. It has been hard but I can honestly say that I feel like we have come out of all of these things so much stronger. Not in the stereotypical ''what doesn't kill you makes you stronger'' kind of way...but I feel like there was a very specific reason that God put so much on us this year. He's prepping us.

"Consider it a sheer gift, friends, when tests and challenges come at you from all sides. You know that under pressure, your faith-life is forced into the open and shows its true colors. So don't try to get out of anything prematurely. Let it do its work so you can become mature and well-developed, not deficient in any way." James 1:2-4

This year I'm thankful for the trials that we've been put through. Thankful that I can feel a stirring in my spirit that something big is coming. I'm thankful that I have the most perfect handpicked partner to walk by my side and to guide me along his journey as well. I am thankful that we have the best family around who rallies around us when we're in trouble and who knows when we need help.  I am thankful to the friends who have proven themselves to be true and who speak such wisdom into our lives.

I am excited for the future and where we're headed together...much stronger than before.

21 November 2012

I know them!

So today my favortie gal, bestie and bride-to-be, Rachel, was featured on Green Wedding Shoes with her fiance Mike. Yeah, for real. I can hardly contain my excitement - I can't wait to be a part of their wedding in March! Click here to see the full spread. Aren't they just BEAutiful?!


{still freaking out}

A festive tablescape

This Thanksgiving we are lucky enough to have some family come to visit us. With Craig's crazy retail schedule this time of year can be a bit unpredictable. Since we weren't flying solo this year I wanted to put up a few decorations around the house. Surprisingly, pumpkins are hard to find after Halloween! I was able to score a few small ones and some colorful squash to hide all around the house. Here's a little peek at how I made my dining room festive for the upcoming holiday...


I'm not one for overly dramatic tables or mantles, I like to keep it simple. Just one afternoon and it was done! No fuss :)

First I had my sweet husband chop down the perfect branch for me - I mean really, isn't he the absolute best?! I'm sure that part of it is that he loves to use his power tools (as I believe you saw in yesterday's post, and many more to come) and if I do say so myself, he's not too hard on the eyes while using them. Just saying.

I ended up painting the branch copper, which made it POP on top of my dark purple runner (from William-Sonoma if you're curious).

I hollowed out a few pumpkins and filled them with candle wax. I usually have this in bulk around my house because I tend to make lots and lots of candles BUT you can easily find this at Michael's or any other craft store. Just put some into a microwave safe container and melt. Make sure to do this in small intervals of time otherwise you might burn it. I usually start with :30 - 1:00 and see how it looks, stir and repeat. 
**Note: after having these on my table for a few days the pumpkin started to dry out and pulled away from the wax. These are perfect to do the day before, but no more than a day or two before having people over.


I really love purple and green together on Thanksgiving, I'm not really sure why but that's why I chose the green tapers here. I had some taper candle holders from Ikea that I lost (err.) so I just used some small glass votive holders filled with rice to hold up the candle and tied some twine around it. Can you say ''Easy''?! This is also useful if you want to have tapers at varying heights - you can just cut the bottom of the candle off and no one will ever see it. Perfect for visual interest! 

Did any of you set up something special for your guests? I just love the holidays...I hope you guys have the BEST time with your friends and family this week! xox
Related Posts Plugin for WordPress, Blogger...